typescript에서 mathjs 사용해서 소수점 정확하게 계산하기

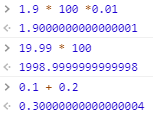
  • 부동소수점으로 인한 계산 오류가 있다
  • mathjs 라이브러리로 해결해보자

mathjs 설치

1
2
yarn add mathjs
yarn add @types/mathjs -D
  • mathjs만 설치하면 타입 정의가 없기 때문에
  • @types/mathjs 보조 라이브러리까지 설치

mathjs 임포트

example1.ts
1
import * as math from 'mathjs';
  • 그냥 기본값으로 사용하려면 import * as math from 'mathjs'로 불러와 사용
  • default export가 없어서 import math from 'mathjs'이런 식으로 사용불가
    • Attempted import error: "mathjs" does not contain a default export
example2.ts
1
2
3
import { create, all } from 'mathjs';

const mathF = create(all, { number: 'Fraction' }) as math.MathJsStatic;
  • 지정 config를 적용해 사용하려면 create 메서드 사용
  • create(all, { number: 'Fraction' }) as math.MathJsStatic
  • as 키워드로 타입을 명시하지 않으면 undefined 에러 발생
    • Cannot invoke an object which is possibly 'undefined'

소수점 계산

calc.ts
1
2
3
4
5
6
7
8
9
import { create, all } from 'mathjs';

const mathF = create(all, { number: 'Fraction' }) as math.MathJsStatic;

const mathjsCalc = (expr: string) => {
return mathF.number(mathF.evaluate(expr));
};

const result = mathjsCalc(`${value1} * ${value2} * 0.01`);
  • evaluate메서드를 사용해서 수식 string을 주면 알아서 계산하도록 했다
  • 이때 math ConfigOptions에서 number 옵션이 기본값(number)인 경우에 일반적인 계산이 된다
  • number 옵션에 Fraction을 주고 생성하게 되면 evaluate 메서드에서 숫자를 Fraction 타입으로 파싱 해서 계산하게 되어 우리가 기대하는 결과를 얻을 수 있다

참고

type vs interface

1
2
3
4
5
6
7
8
9
10
// X
type MyFile extends File = {}

// O
interface MyFile extends File {
preview: string;
}

// O
type MyFile = {preview: string} & File
  • type은 extends, implements가 안됨
  • 대신 extends의 경우는 & 키워드를 사용하여 대체할 수 있다
  • interface와 type은 거의 같은 역할을 한다
  • 그래서 둘중 하나만 사용하여 일관적인 스타일을 유지하는 게 좋다고 들었다

참고

  • 나는 typescript를 공부하면서 처음 접한게 type이라서 type을 쭉 사용해왔다
  • 그런데 상속을 해야하는 경우에 마추쳤을 때, 불가피하게 interface 키워드를 사용했고,
  • type을 사용할 수 없을까 찾아보다가 type vs interface 에 대한 좋은 링크를 찾았다

typescript json import

tsconfig.json
1
2
3
4
5
6
{
"compilerOptions": {
// (...)
"resolveJsonModule": true
}
}
  • tsconfig.jsoncompilerOptions 부분에 resolveJsonModule를 추가한다
ex.ts
1
import myJsonData from './myJson.json';
  • 이런식으로 가져다 쓸 수 있다

참고

ts-node

terminal
1
ts-node src/index.ts
  • tsc를 통해 .js파일로 만들고, js파일을 실행하는 것이 아니라
  • 바로 .ts 파일을 실행하는 것처럼 보여준다
  • 따로 .js파일은 생성되지 않는다

ts-node 설치

terminal
1
npm install -g ts-node

참고

TypeDoc 시작하기

따라하기

TypeDoc 생성하기

샘플 코드 작성

package.json
1
2
3
4
5
6
7
8
9
10
11
12
13
14
15
16
17
18
{
"name": "typedoc-practice",
"version": "1.0.0",
"description": "",
"main": "index.ts",
"scripts": {
"tsc": "tsc",
"test": "echo \"Error: no test specified\" && exit 1"
},
"author": "",
"license": "ISC",
"devDependencies": {
"typedoc": "^0.19.2",
"typescript": "^4.0.3",
"typedoc-plugin-nojekyll": "^1.0.1"
},
"dependencies": {}
}
  • 연습용 디렉터리를 생성하고 위 내용으로 package.json을 생성한다
cmd
1
npm i
  • 종속성을 설치한다
tsconfig.json
1
2
3
4
5
6
7
8
9
10
11
12
13
14
15
{
"compilerOptions": {
"baseUrl": ".",
"paths": { "*": ["types/*"] },
"target": "ES3",
"module": "commonjs",
"sourceMap": true,
"resolveJsonModule": true,
"esModuleInterop": true
},
"typedocOptions": {
"mode": "modules",
"out": "docs"
}
}
  • 타입스크립트 설정파일 tsconfig.json를 생성한다
index.ts
1
2
3
4
5
6
7
8
9
10
11
12
13
14
15
16
17
18
19
20
21
22
23
24
25
26
27
28
29
30
31
32
33
34
35
36
37
38
/**
* This class keeps track of the version number
* of your application.
*/
class Status {
/**
* This property ...
*/
public version: number = 0;

/**
* This method prints out the current version number
*/
public showVersion() {
console.log('version:', this.version);
}

/**
* This method increases the version number with 1
*
* @returns the current version number
*/
public increaseVersion() {
this.version += 1;
return this.version;
}

/**
* change the version number to the provided number
*
* @param version the number that needs to be used as a version number
* @returns the current version number
*/
public changeVersion(version: number) {
this.version = version;
return this.version;
}
}
  • index.ts를 생성하고, 독주석을 작성한다
  • 나는 Typescript: generate documentation를 참고하여 작성하였다
  • javaDoc과 동일한 문법으로 작성하면된다
  • 독주석을 작성하고싶은 클래스나 메서드, 변수 위에 /**를 타입하면 독주석 자동완성이 나온다
  • 자동완성으로 만들경우에 @param, @returns가 자동완성된다

typedoc 생성하기

  • 이제 문서를 생성해보자
cmd
1
npx typedoc --out docs
  • docs라는 폴더가 생긴다
  • docs/index.html 파일을 열어서 잘 만들어졌는지 확인한다
  • 이제 깃허브에서 볼 수 있도록 해보자

깃허브에 올리기

  • 처음 package.json에 보면 typedoc-plugin-nojekyll 모듈을 설치해줬는데,
  • 기본적으로 깃허브 페이지는 지킬 기반으로 동작한다
  • 지킬에는 어떤 규칙이 있는데 _로 시작하면 페이지가 안나온다
  • typedoc을 통해 생성된 html은 _index_.html 이런식으로 _가 붙는다
  • 따라서 docs/ 디렉터리에 지킬을 사용하지 않는다는 것을 알리는 .nojekyll이라는 파일을 만들어놔야한다
  • 수동으로 .nojekyll을 추가할 수 있지만, npx typedoc --out docs명령을 쓸때마다 초기화되서 불편하다
  • typedoc-plugin-nojekyll 모듈은 이 문제를 해결해준다

.gitignore 추가

.gitignore
1
2
3
4
5
6
7
8
9
10
11
12
13
14
15
16
17
18
19
20
21
22
23
24
25
26
27
28
29
30
31
32
33
34
35
36
37
38
39
40
41
42
43
44
45
46
47
48
49
50
51
52
53
54
55
56
57
58
59
60
61
62
63
64
65
66
67
68
69
70
71
72
73
74
75
76
77
78
79
80
81
82
83
84
85
86
87
88
89
90
91
92
93
94
95
96
97
98
99
100
101
102
103
104
105
106
107
108
109
110
111
112
113
# Created by https://www.toptal.com/developers/gitignore/api/node
# Edit at https://www.toptal.com/developers/gitignore?templates=node

### Node ###
# Logs
logs
*.log
npm-debug.log*
yarn-debug.log*
yarn-error.log*
lerna-debug.log*

# Diagnostic reports (https://nodejs.org/api/report.html)
report.[0-9]*.[0-9]*.[0-9]*.[0-9]*.json

# Runtime data
pids
*.pid
*.seed
*.pid.lock

# Directory for instrumented libs generated by jscoverage/JSCover
lib-cov

# Coverage directory used by tools like istanbul
coverage
*.lcov

# nyc test coverage
.nyc_output

# Grunt intermediate storage (https://gruntjs.com/creating-plugins#storing-task-files)
.grunt

# Bower dependency directory (https://bower.io/)
bower_components

# node-waf configuration
.lock-wscript

# Compiled binary addons (https://nodejs.org/api/addons.html)
build/Release

# Dependency directories
node_modules/
jspm_packages/

# TypeScript v1 declaration files
typings/

# TypeScript cache
*.tsbuildinfo

# Optional npm cache directory
.npm

# Optional eslint cache
.eslintcache

# Microbundle cache
.rpt2_cache/
.rts2_cache_cjs/
.rts2_cache_es/
.rts2_cache_umd/

# Optional REPL history
.node_repl_history

# Output of 'npm pack'
*.tgz

# Yarn Integrity file
.yarn-integrity

# dotenv environment variables file
.env
.env.test

# parcel-bundler cache (https://parceljs.org/)
.cache

# Next.js build output
.next

# Nuxt.js build / generate output
.nuxt
dist

# Gatsby files
.cache/
# Comment in the public line in if your project uses Gatsby and not Next.js
# https://nextjs.org/blog/next-9-1#public-directory-support
# public

# vuepress build output
.vuepress/dist

# Serverless directories
.serverless/

# FuseBox cache
.fusebox/

# DynamoDB Local files
.dynamodb/

# TernJS port file
.tern-port

# Stores VSCode versions used for testing VSCode extensions
.vscode-test

# End of https://www.toptal.com/developers/gitignore/api/node
  • .gitignore 파일을 만든다. node프로젝트용 무시목록이다

  • 깃허브에 저장소를 만들고 푸쉬한다

  • 저장소 > 세팅
  • master, docs 선택하고 save버튼을 누른다
  • 생성된 링크를 클릭해서 잘 동작하는지 확인한다

여기까지 소스코드