hexo server로 로컬에서 미리보기

배포하기 전에 로컬에서 미리보자

미리보기

hexo server

  • 위 명령어를 통해서 로컬에서 내 블로그를 미리 볼 수 있다

  • 4000번 포트로 접속하면 된다

  • hexo server -p 3000 과 같이 -p 옵션을 통해서 포트를 지정할 수도 있다

  • 가장 좋은 점은 변경 사항이 있으면 바로바로 갱신되어 나온다

  • 실험적인 시도들을 먼저 로컬에서 해보고 잘되면, 배포할 수 있다


  • 이미지를 수정했는데 적용이 안되어 보일 수 있는데 브라우저 캐시 문제다
  • 배포해서 깃허브에 올라가면 제대로 수정된 이미지가 보인다
  • 깃허브에 배포해도 그 즉시 적용이 되지 않고 조금 시간이 걸린다
  • 따라서 hexo server이 좋다!

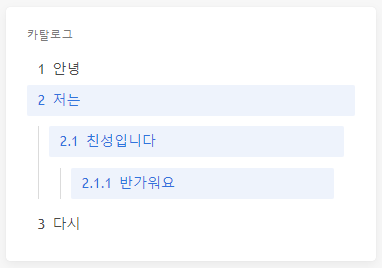
toc (목차) 사용하기

안녕

하세요

저는

친성입니다

만나서

반가워요

다시

만나요

1
2
3
4
5
6
7
8
---
title: toc 사용하기
date: 2020-09-17 09:22:30
category: blog
tags:
- hexo
toc: true
---
  • toc: true를 추가시켜주면 헤딩 태그(h1~h6)를 파싱하여 목차를 만들어 줍니다

  • 처음에 적용해 보시면 목차 깊이가 2개밖에 되지 않는다고 생각할 수 있는데

  • 스크롤 해보시면 숨겨져있다가 나옵니다!

멋진 깃허브 블로그 시작하기

  • 나도 멋진 깃허브 블로그를 만들어보고 싶었다. (지금 이 블로그!)

  • Hexo 라는 블로그 프레임워크가 있었다

  • 한글로 된 공식 문서도 있어서 접근하기 좋았다

  • 나는 카인드패밀리님의 영상을 보고 따라하면서 만들어 보았다

  • Hexo를 이용하면 멋진 블로그를 뚝딱하고 만들 수 있다

  • 간단하게 설명하자면,

  • Hexo에서 원하는 테마를 받아와서 글을 쓰고, 내 github.io 저장소와 연결하고 배포하는 거다

따라하기

  • 먼저 nodejs와 git이 설치되어 있어야 한다
  • 또, https://chinsun9.github.io/ 와 같은 url을 얻고싶으면 {자기 깃허브 아이디}.github.io이름의 저장소가 있어야한다
  • 준비되었다면 cmd를 열고 hexo cli를 전역으로 설치한다
  • 나는 vscode에서 터미널을 열어서 진행했다. vscode가 최고다
terminal
1
npm i hexo-cli -g
  • hexo 프로젝트 생성

  • 적당한 빈 디렉터리로 이동한다음에 아래 명령어를 실행한다

  • 혹시 다른 테마를 적용하길 원하는 사람은 테마 적용방법을 찾아 보기 바란다. 여기선 icarus를 설명한다

terminal
1
2
hexo init
npm i hexo-theme-icarus
  • 다음엔 icarus테마를 위한 config를 생성한다
terminal
1
hexo config theme icarus
terminal output
1
2
3
4
5
6
7
8
INFO  Validating config
ERROR {
err: [Error: EISDIR: illegal operation on a directory, read] {
errno: -4068,
code: 'EISDIR',
syscall: 'read'
}
} Plugin load failed: %s hexo-theme-icarus
  • 위 같은 오류가 나면 무시하고 다시 명령을 실행한다
terminal
1
hexo config theme icarus
terminal output
1
2
3
4
5
6
7
INFO  === Checking package dependencies ===
ERROR Package bulma-stylus is not installed.
ERROR Package hexo-renderer-inferno is not installed.
ERROR Please install the missing dependencies your Hexo site root directory:
ERROR npm install --save bulma-stylus@0.8.0 hexo-renderer-inferno@^0.1.3
ERROR or:
ERROR yarn add bulma-stylus@0.8.0 hexo-renderer-inferno@^0.1.3
  • 그러면 다른 오류메시지가 나온다
  • 이러이러한 패키지가 필요하다하면 추가로 설치해준다
terminal
1
npm install --save bulma-stylus@0.8.0 hexo-renderer-inferno@^0.1.3
  • 현재까지 설치된 패키지 목록
package.json
1
2
3
4
5
6
7
8
9
10
11
12
13
14
15
16
17
18
19
20
{
// ...
"hexo": {
"version": "5.2.0"
},
"dependencies": {
"bulma-stylus": "^0.8.0",
"hexo": "^5.0.0",
"hexo-generator-archive": "^1.0.0",
"hexo-generator-category": "^1.0.0",
"hexo-generator-index": "^2.0.0",
"hexo-generator-tag": "^1.0.0",
"hexo-renderer-ejs": "^1.0.0",
"hexo-renderer-inferno": "^0.1.3",
"hexo-renderer-marked": "^3.0.0",
"hexo-renderer-stylus": "^2.0.0",
"hexo-server": "^2.0.0",
"hexo-theme-icarus": "^4.0.1"
}
}
  • 종속성이 해결되면 다시 실행
terminal
1
hexo config theme icarus
terminal output
1
2
3
4
5
6
7
8
9
INFO  === Checking package dependencies ===
INFO === Checking theme configurations ===
WARN None of the following configuration files is found:
WARN - C:\git\tmp blog\_config.icarus.yml
WARN - C:\git\tmp blog\node_modules\hexo-theme-icarus\_config.yml
INFO Generating theme configuration file...
INFO C:\git\tmp blog\_config.icarus.yml created successfully.
INFO To skip configuration generation, use "--icarus-dont-generate-config".
INFO === Registering Hexo extensions ===
  • 위처럼 메시지가 나오면 성공이다

  • 이제 최상위 디렉터리에 _config.yml 이라는 파일이 있는데 아래 처럼 수정한다

  • 블로그가 될 저장소 주소를 적어준다

_config.yml
1
2
3
4
5
theme: icarus
deploy:
type: git
repo: https://github.com/chinsun9/chinsun9.github.io
branch: master
  • 여기까지 성공적으로 됬다면 로컬에서 확인해 볼 수 있다
terminal
1
hexo server -p 3000
  • 새 포스트를 써보자
terminal
1
hexo new "타이틀"
terminal output
1
2
3
4
INFO  === Checking package dependencies ===
INFO === Checking theme configurations ===
INFO === Registering Hexo extensions ===
INFO Created: C:\git\2020-github-pages-hexo\source\_posts\new-post20200916.md
  • 위와같은 메시지가 나오는데 vscode터미널같은 경우 ctrl+click을 통해 바로 저 파일을 열어 볼 수 있다

  • 열어서 열심히 md 언어로 포스팅을 하고 저장한다

  • 이제 배포를 해보겠다

  • hexo-deployer-git을 설치한다

terminal
1
2
npm i hexo-deployer-git -g

  • 그러면 다음 명령어를 사용할 수 있다
terminal
1
2
hexo generate
hexo deploy
  • 위처럼 명령어를 두번쓰기 귀찮아서 명령어 하나로 묶어 버렸다
  • 하는 김에 hexo 커밋까지..
package.json
1
2
3
4
5
6
7
8
9
10
11
{
// ...
"scripts": {
"build": "hexo generate",
"clean": "hexo clean",
"deploy": "hexo deploy",
"test": "hexo server",
"start": "hexo generate & hexo deploy & git add . & git commit -m "
}
// ...
}
  • 글을 하나 쓰고 나면 npm start 명령어로 배포하고 커밋한다.
    npm start "커밋메시지"
  • 이런식으로 써서 편하게? 관리하려고 했다